Please note, the Hub application is under active development. As such, text and screenshots may quickly become out of date. If you have any questions about current Hub functionality, please reach out to your Hub contact directly.
Use the schedule tab to add phase milestones to a project.
Navigate to the Schedule Tab
To navigate to this tab, click the Schedule Tab on the tab strip within a project.
Note:
- Users with hub.scheduling.user can view this tab
- Users with hub.scheduling.coordinator can use MS Project functions.
- Users with hub.schedule.edit or hub.programming.technician can create schedules, add milestones, and edit milestone dates.
- Users with hub.regional.manager roles can edit milestone dates.
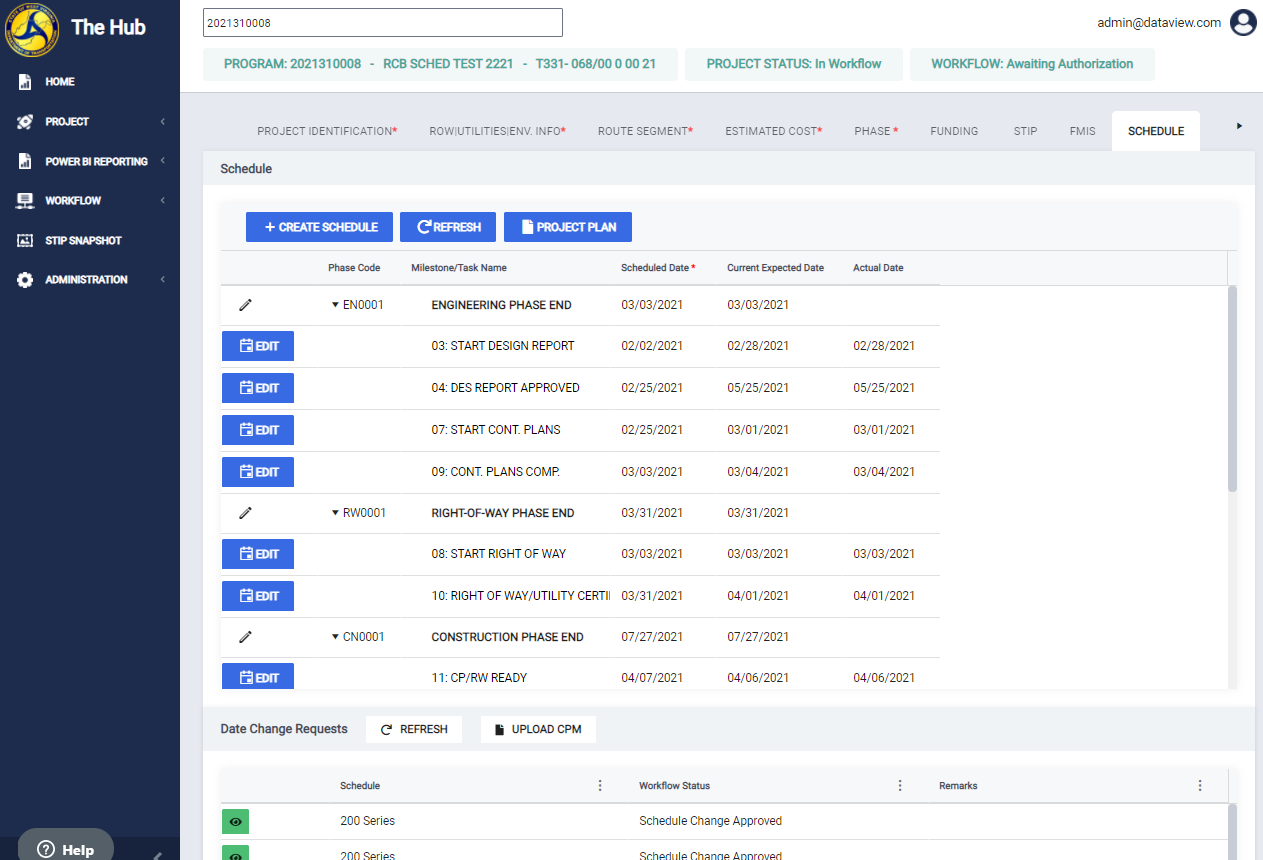
When you select the Schedule tab, you will be presented with a +CREATE SCHEDULE button and a grid with the following columns.
- Phase Code
- Milestone/Task Name
- Schedule Date
- Current expected Date
- Actual Date
Create a schedule and add milestones/tasks
You can add a schedule once an estimated Phase has been added to the project.
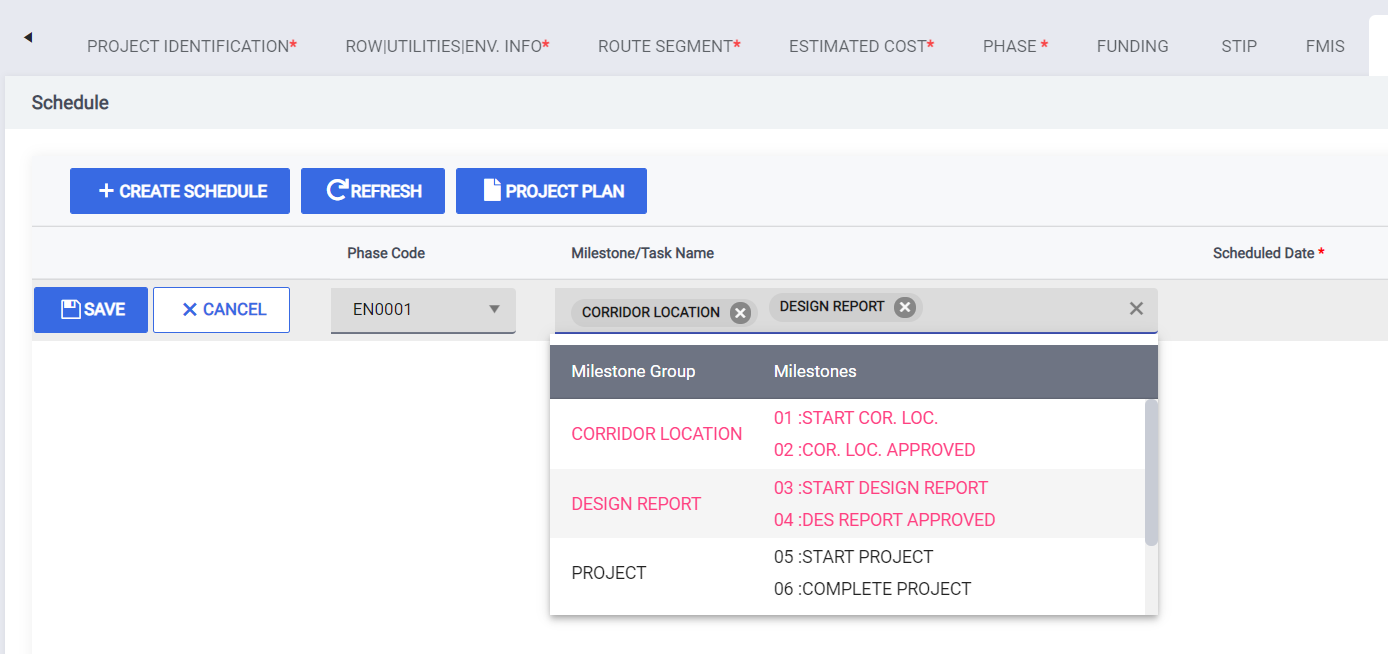
To create a schedule, click the +Create Schedule button. Once clicked, the application inserts a new blank line with two selectable fields:

- Phase Code: Estimated phases that do not yet have a schedule will appear in this dropdown. Select the phase for which you are creating the schedule.
- Milestone/Task Name: After selecting the phase, click in this field to select all the milestones and tasks you'd like to add to this phase's schedule. This field allows you to select one or more values.
- As you select each value, the text turns red and the values are displayed in the field. You also have the option of deleting (x) any value you do not need. When you delete a value, it is removed from the field.In the below example, a construction phase was added, then a schedule was created for the construction phase and several milestones were selected
Once you have finished selecting the milestones/tasks, click the Save button to save your changes.
Updating the milestone/task "Scheduled Date"
Once you've saved it, the grid will update with all the milestones/tasks you selected.
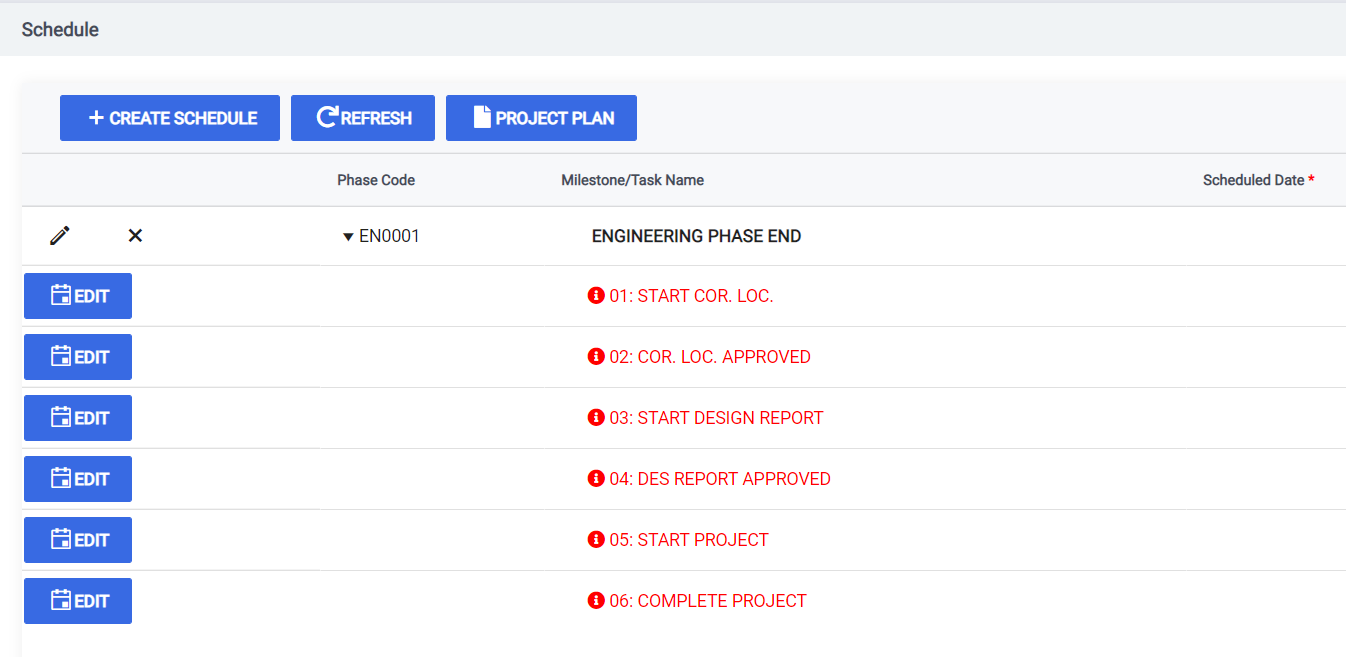
Click the Edit button on the milestone row to enter a scheduled date.
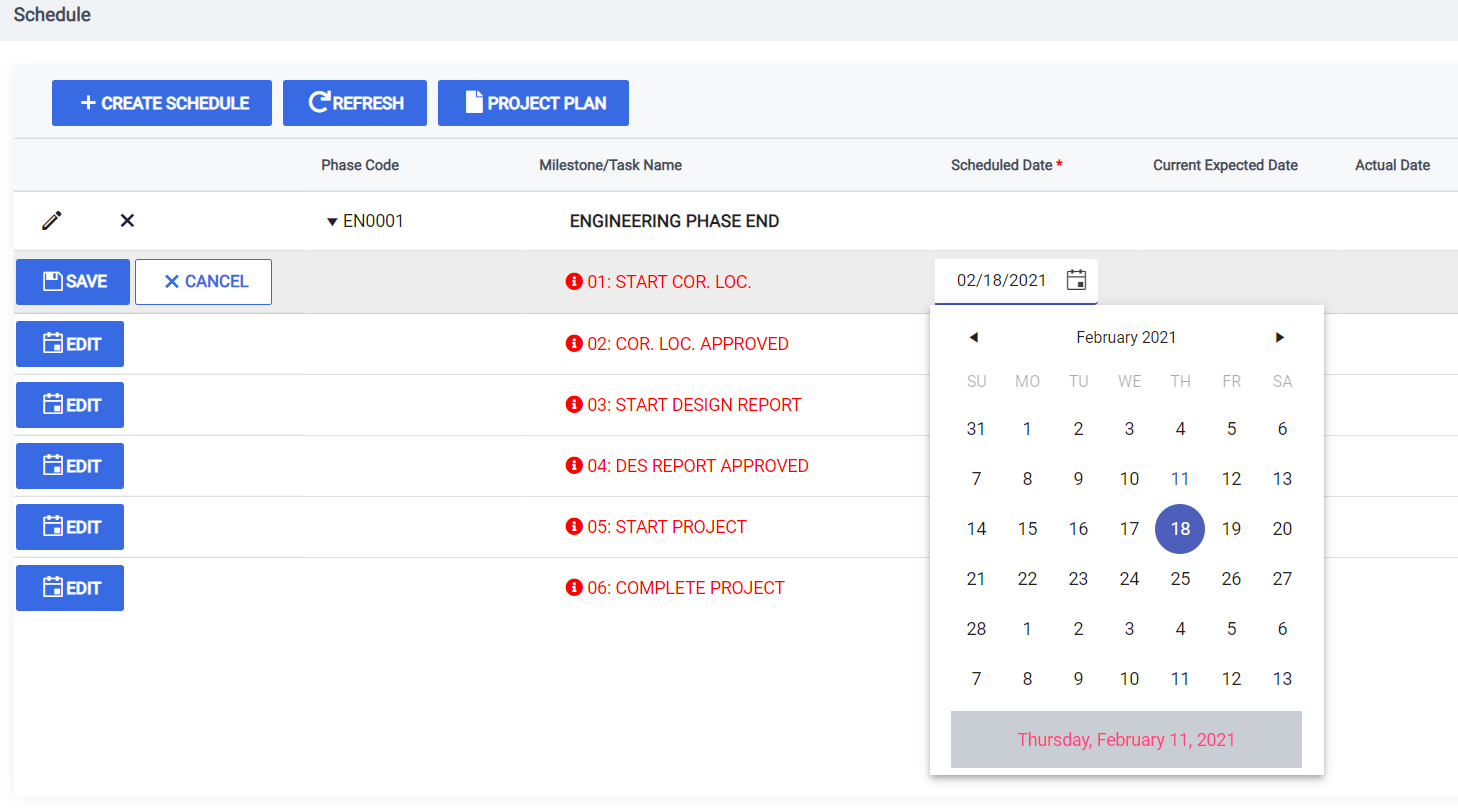
Dates can be entered manually or selected from the calendar. Once, the date is entered, click Save to save the changes.
If you wish to edit the milestone/task, click the Edit button again
Note
- Milestone dates are listed in sequential order, dates can not be less than preceding milestones or greater than following milestones or else an error will be shown.
- If you do not select save, the milestone will not be updated and will remain in edit mode. If you navigate away from this page without saving, your changes will be lost.
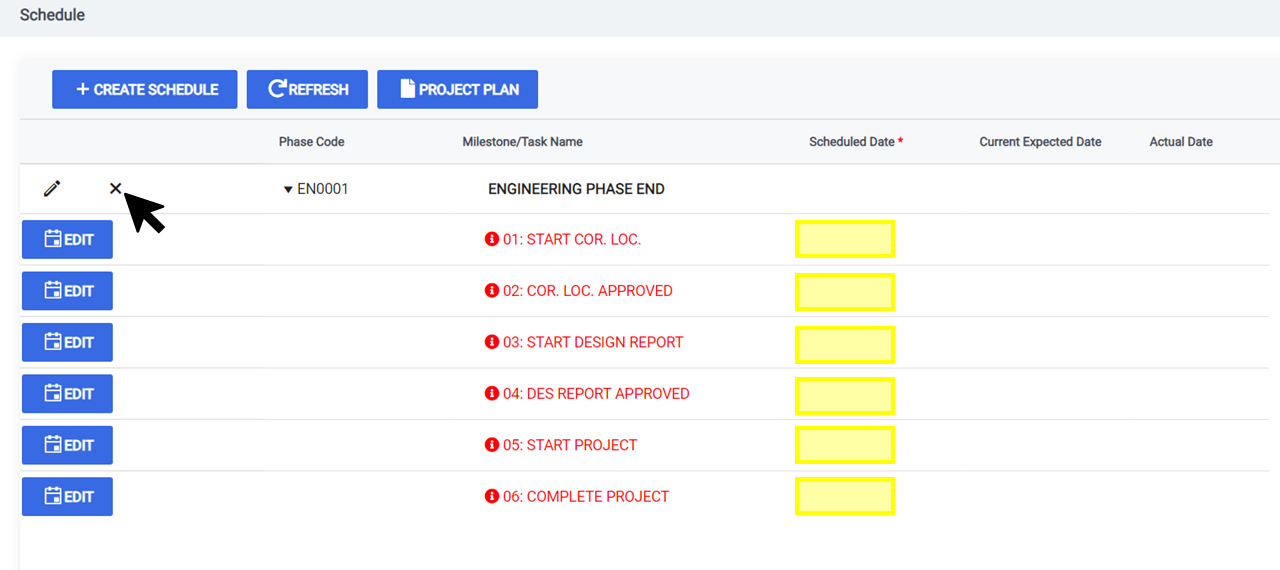
Remove milestones/tasks
To remove a milestone, you must first clear the date from the milestone. First, click Edit to edit the milestone. Then remove the date in the Scheduled Date column. Once removed, click the pencil icon at the top of the phase. This will enable the 'Milestone/Task Name" field. Find the milestone you wish to remove, and click the "X". This will remove the milestone from the schedule. Click "Save" to save your changes.

Delete a schedule
All milestones dates must be removed before you can delete a schedule. Follow the Remove milestones/tasks steps above to remove milestone dates. Once clicked, you will receive a confirmation popup. Confirm the changes to delete the schedule.
Updating the "Current Expected Date"
Once a phase is authorized (at 'FHWA review 2' for participating and 'Final Programming Review' for non-participating phases), the Current Expected Date will be populated from the Scheduled Date. You can edit the Current Expected date by clicking the Edit button. The Scheduled Date at this stage will be locked and not editable.
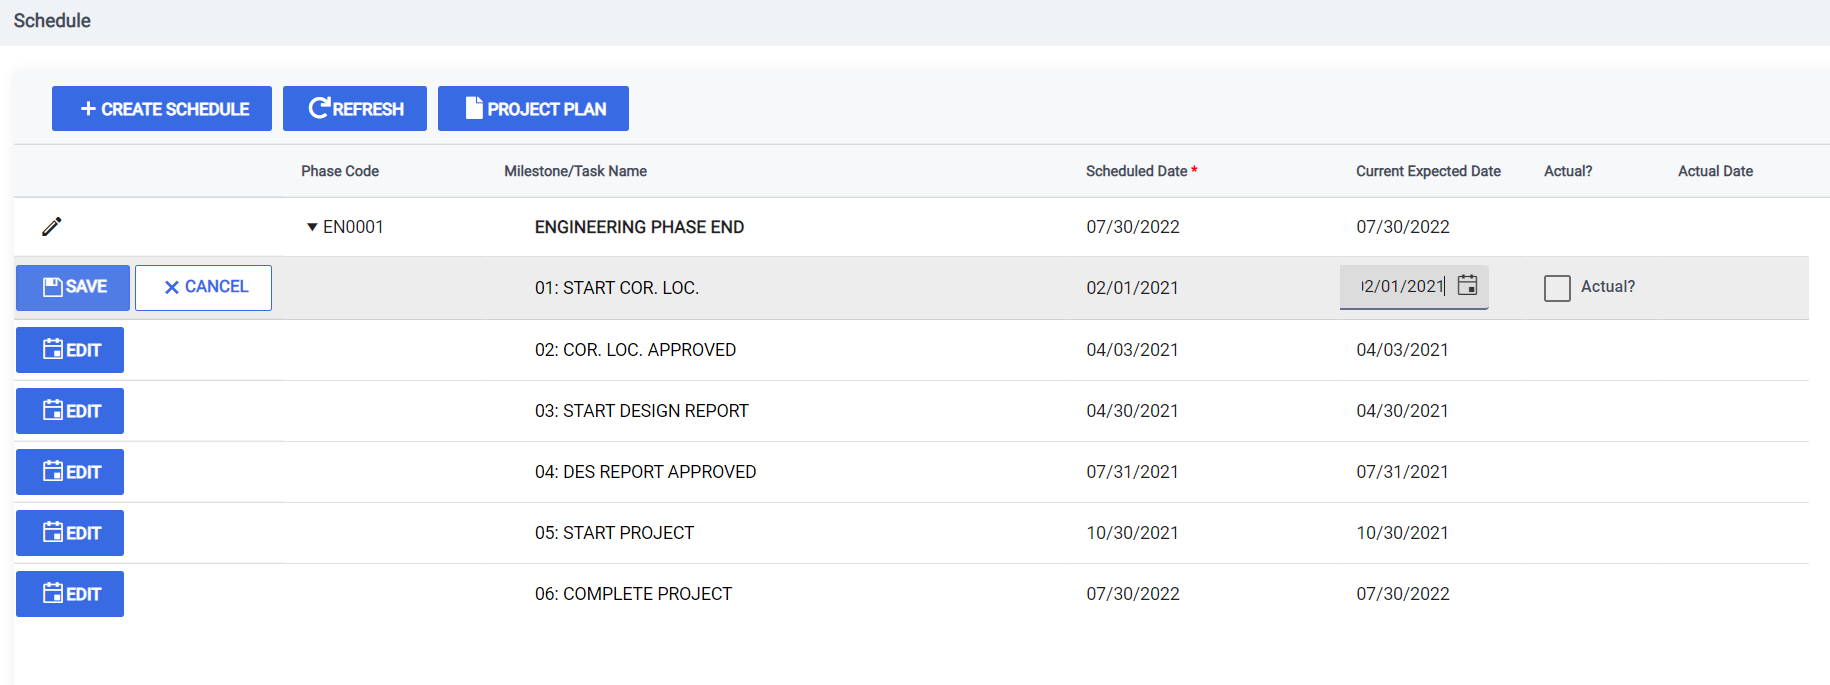
Updating the "Actual Date"
You can indicate the Actual Date for milestones on Authorized phases. To do this, click edit on the milestone, then click the Actual? checkbox. This will copy the Current Expected Date to the Actual Date column on save.

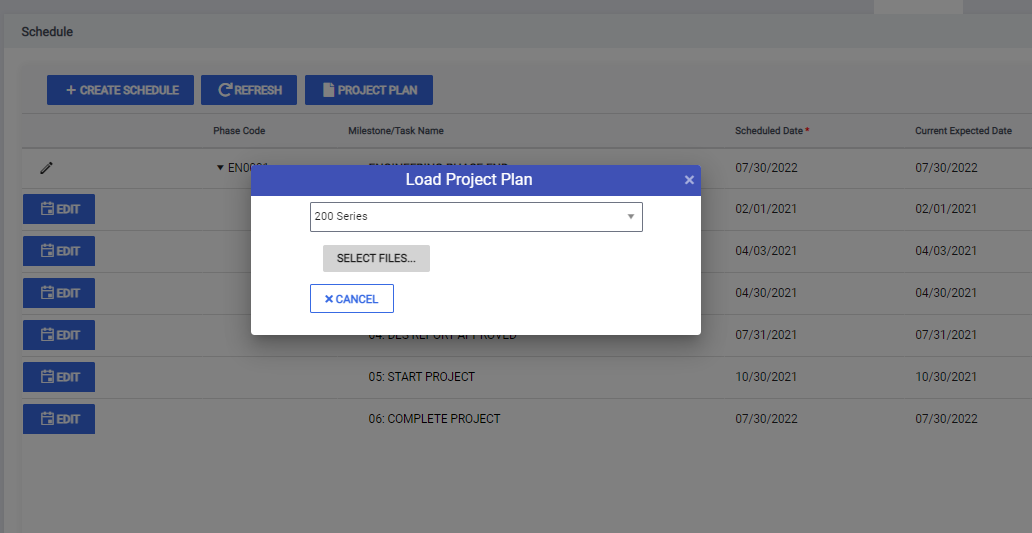
Generate a Project Plan
The Project Schedule tab lets you generate a Microsoft Project File of the milestone schedule. To generate the MS Project file, click the Project Plan button. A popup will appear that will allow you to select a plan template (200 or 300 series) and name your file. Once you've made your selections, click Create to generate and save the file.

Request a Date Change through CPM Upload
The bottom portion of the Schedule tab is the Date Change Requests section This section allows you to request schedule changes to existing milestones through a 200 or 300 series CPM upload. This feature is only available to users with the hub.scheduling.coordinator role.
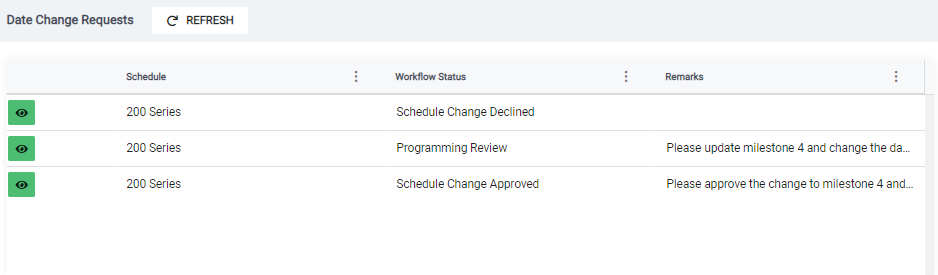
This Grid has the following columns:
- The eye icon: Click this to view the schedule
- Schedule: This denotes whether it is the 200 or 300 series schedule.
- Workflow Status: This displays the workflow state that the schedule is currently in
- Last Reviewed by: The User that reviewed the schedule last
- Last Review Date: The Date when the schedule was reviewed last.
- Remarks: The remarks added by the reviewer (not required). This will be updated on the Date Change Request section for that particular record.
To request a date change, click the Upload CPM button. Then, click Select Files once the popup window is opened. This will open your computer's local file explorer. Navigate to the file on your computer and click Open.
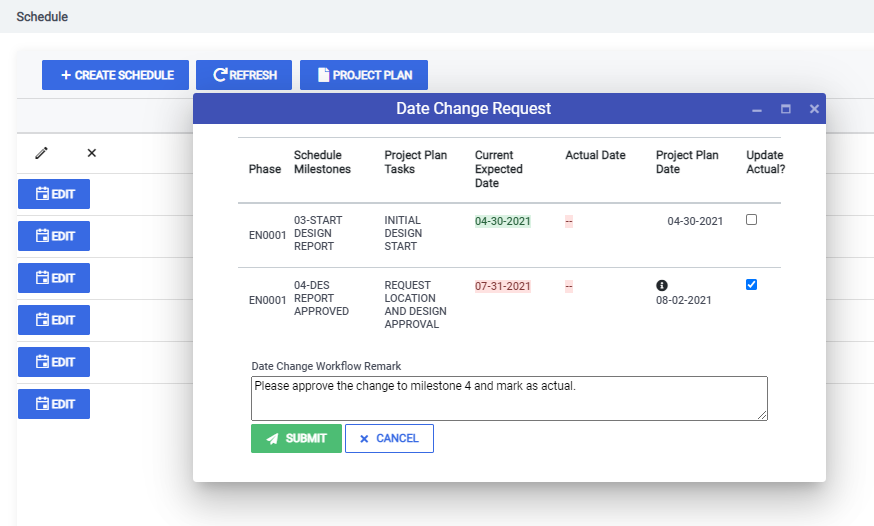
Once a CPM file has been uploaded, you are presented with the Date Change Request popup. This popup displays the milestones that correspond to the project plan. From here, you can confirm the details of the date change or indicate that you want the date to be changed from "Current Expected" to "Actual". Fields for this popup are as follows:
- Phase: Displays the Phase for which the milestone data is being updated
- Schedule Milestones: Displays the milestones that correspond to the CPM
- Current Expected Date: The expected date currently specified in Hub
- Actual Date: The actual date currently specified in Hub
- Project Plan Date: The change to the date as specified on the CPM
- Update Actual?: A flag that lets you specify if this date should be updated as an actual date.
- Date Change Workflow Remark: Lets you enter comments about the date change request.
After you have confirmed the details of the submission, click the Submit button to submit this date change request for review.
View Your Requested Date Change Requests
Once you have submitted a change request to the approval workflow, you can check its status by following these steps.
First, click Workflow and then Schedule on the left-hand side menu. This opens the Schedule Workflow page. Then, click In Workflow. All date change requests you have submitted will be listed here with their current Workflow Status.

Note
If a CPM template is uploaded without matching milestones then it will be rejected by Hub.
Approve or Reject a Date Change Request
Users with the hub.programming.technician role can Approve or Reject a Date Change Request.
Once a date change request has been submitted to the approval workflow, you can review, approve, or reject by following these steps.
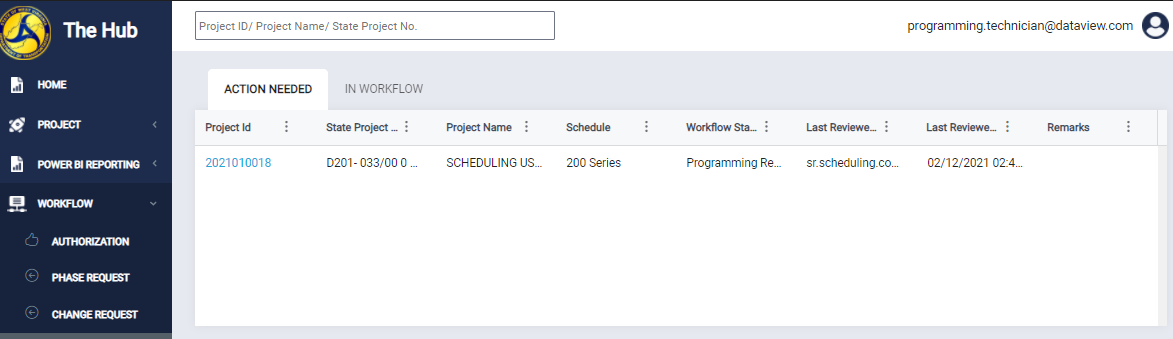
First, click Workflow and then Schedule on the left-hand side menu. This opens the Schedule Workflow page. Then, click the Action Needed tab. All date change requests that require review are listed here along with information about that request.
To review the request, click the Project ID. This will take you to the project's Scheduling Tab.
Once on the scheduling tab, you can view all requests in the Date Change Request section. Click the Green Eye icon to view the request.
Once the Date Change Request popup is opened you can view the request and take action by either Approving or Rejecting it. Once approved, the date changes will be reflected on the milestones schedule. The changes will not be reflected if the request is rejected. The change request popup shows the following information:
- Phase: Displays the Phase for which the milestone data is being updated
- Schedule Milestones: Displays the milestones that correspond to the CPM
- Current Expected Date: The expected date currently specified in Hub
- Actual Date: The actual date currently specified in Hub
- Project Plan Date: The change to the date as specified on the CPM
- Update Actual?: A flag that lets you specify if this date should be updated as an actual date.
- Date Change Workflow Remark: This lets you enter comments about the approval or rejection.

Comments
0 comments
Please sign in to leave a comment.